Site navigation:
Home
Links page one
Links page two
My Models
Superwheel
learn Spanish
The building of the Zero Superwheel
Start with a large tire something like what you see here. Note that we are not concerned at all about the wheel - just the tire.
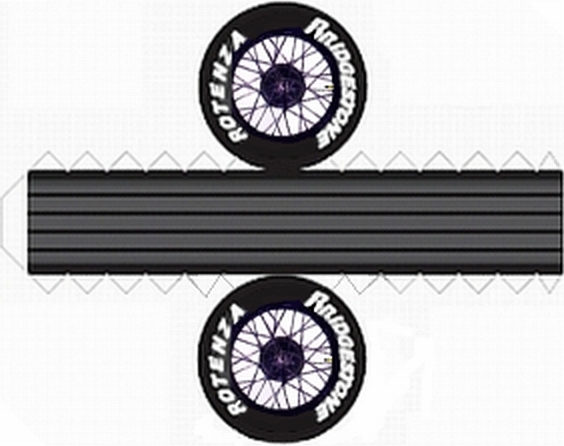
It does not matter what is in the center - it will be cut out - just pick any tire that will look good. Also note that if the wheel to be used is of the 'other' type - glue tabs on the circles and a plain rectangle for the tread - this operation can still be done. Just be prepared to 'read between the lines' a bit right at the end of the assembly.
Do whatever sizing is going to work for the car in question. Print this out and cut out. Now cut the centers out, that is the wheel itself, leaving only the tire and a narrow edge - in this case I have cut out the part with the spokes and just a narrow edge. (You can go ahead and use these spoked wheels if you're building a "Rat Rod" version of something from 1929-ish era.) (This is the wheel of a BMW Dixi of about 1929.)
Otherwise use any wheel that looks good to you -at best a photo of the actual wheel of the car in question. Or if you draw, go for it; or if you have a cartoon wheel that makes whatever image you are trying to create, print that out.
A short digression: Does every part have to be paper, or can other materials be used? Well . . .
- Now, finally, to work -
Calculation: How wide is the final wheel to be?
Having settled on a number, if the tread width you want is less than the width you have printed out, cut the tread in half along its centerline and remove half the excess from each half. If you are making the tread wider, for now just split the tread. Later you will add width when joining the two sides back together. Don't rejoin them yet - what follows will be just a bit easier if you only have to handle one side of the wheel at a time. Not that it's that hard - it's not.
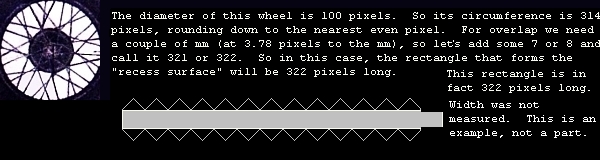
Okay. Next calculation. Carefully measure the diameter of the disk you have cut out of the tire, or its replacement - same size exactly. Don't try to use any different size. (That's another project - can be done, but the following is for a replacement disk of the same size.) Now multiply by pi, 3.1416 will do. The result is the circumference of your "hub disk". The recess surface piece will be this long plus some 2 to 4 mm for overlap (glue tab where the part joins itself).
Next calculation - back to your width calculation above. There will be a large width, and a smaller width which is the thickness of the hub part - in the case of the prototype the "hub thickness" was thought to be right at about 9 mm. This was deducted from the overall width, in my case 28.5 mm, leaving 19.5 mm. Half of this is on each side (in this case, tho not necessarily), so each "recess surface" is 9.75mm wide (As in reality, the recess may be "staggered", with a deeper recess on one side.) Take your time and be sure of what you are visualizing. Get this piece right.
If the two calculations above have been very carefully done, this will work fine. The "Recess Surface" will be a long rectangle having glue tabs all along both edges; one end also tapering a bit about where the actual circumference should fall. . From there on the rest is glue tab. If you are going to color this piece, do it now, with crayon or something. Keep off the glue tabs except right at edge - you should go over the edge a bit rather than have the edge show . . .
Now one optional step, only for those who want wheels that rotate. Cut a small hole only 1mm diameter or less, in the center of each hub piece. There will be a hub bushing - a cylinder of paper - and an axle of wood - later. If you are just going to glue the wheels rigidly to the body or chassis, and they don't need to turn or come off, don't bother with this hole.
The task at hand is to surround each center disk - or hub disk if you will - with a "recess surface", the long rectangle we just made. Glue them and clamp or whatever and wait for them.
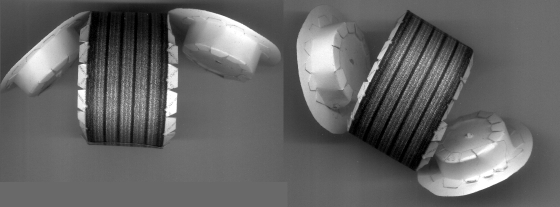
When they are dry and hard we can proceed. As shown, the glue tabs along the edge of the tire tread might need to be trimmed so that they don't impact with the recess surfaces. This having been done, the wheel will be assembled in the normal fashion. If you did split the tread in order to narrow or widen it, now is the time to rejoin it before attaching the tread to the sides of the wheel.. Print out a tread and cut it just a bit narrow, and use that to join the two sides of the split tread. This will also serve to make the tread take a nice strong even curve. In just a few minutes, as soon as the tread can be worked, better form the curve sooner than after it gets hard. After it does get hard, in a good circle, get all the glue tabs to lie in a plane, and put the wheel side on. Be ready with a moderate weight that will sit nice and flat. Adjust to make the truest possible circle, weigh it down and leave it be awhile. If you're getting good at wheels, do both sides simultaneously. Trying to do one side at a time is liable to be troublesome in the case of a complicated wheel. If you think you aren't expert enough to do both sides of a wheel at the same time - well, maybe today is the day you find out that all you had to do was make your mind up to do it, then do it. The worst that can happen is that you completely ruin it and have to start over. And if you're not willing to deal with THAT possibility, maybe you should do something else rather than papercraft.
Now if making wheels that turn, your next task is to figure out your axle. I recommend a shishkebab skewer or schaschlik skewer. You can get them of bamboo. Pick a straight one, even if that's not the roundest one.
If the axle is at hand, we need one more calculation. The hub width plus about 1mm on each side will be the width of the next piece, which is the "axle bushing". It should be cut long enough that if it is wrapped about 3 plies around the skewer, you still have enough to hold it by. Start by pinching its very end together with the skewer and then turning the skewer keeping the paper well pinched, such that the paper is wrapped tightly around, goes around two or three times. When this is ready, do it again with glue - but be careful not to get any glue on the inside - DON'T glue the skewer fast to the bushing.
When this is thoroughly hard, enlarge the holes in the hub disks until the bushing will go through making a tight fit. When it will just go, apply glue and stick it through so that a small amount protrudes out the other side. Hopefully this is right - if not, do it over until it is. When it is glued in place, rotate the wheel, and correct it if it "wobbles" or "wanders". When it will turn "true", brace in place if necessary and set aside until hard.
And there it is.
Behold the pair of superwheels on a wooden axle.
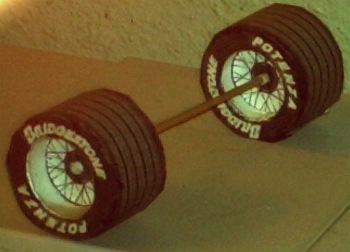
A bit ragged, but we are building a very rough street hot rod here . . . (a byproduct of a complete original model project of mine, a paper model of BMW's first car - the Dixi. This project is in its final stages - the "Rat Rod" being made from the leftover hulk of a prototype. Look in these pages soon for a model plan that you can download.) Update April 2006: I hit an unexpected snag, in that I simply couldn't figure out a way to make the headlights out of paper. Look at this picture
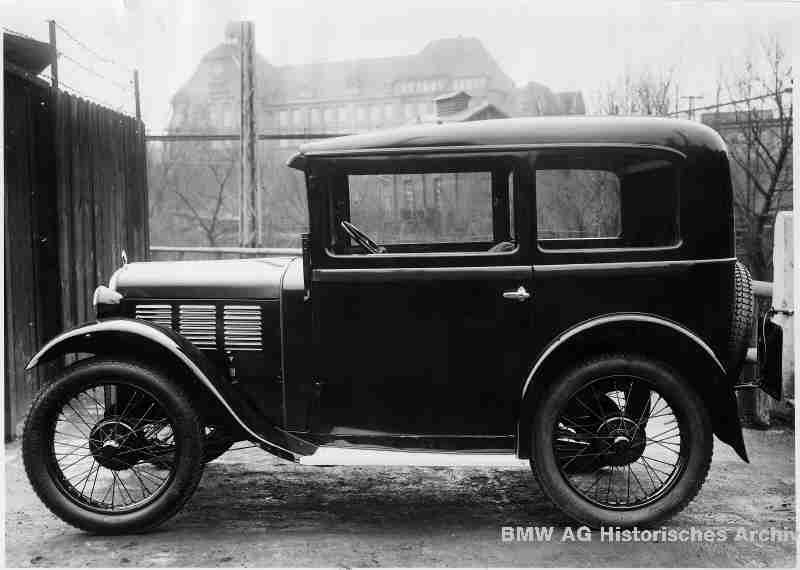
and you'll see how round the headlights are. I might wind up carving them out of wood; if any of you can help me with that, please contact me.
Contact Paper Model Zero: papermodel0@lycos.com
Site navigation:
Home
Links page one
Links page two
My Models
Superwheel
learn Spanish
... or visit my friend Miraculix, nicknamed Karl Marx, who is an aquarist along with being a leftist and another student of Spanish.